 |
 |
 |
|
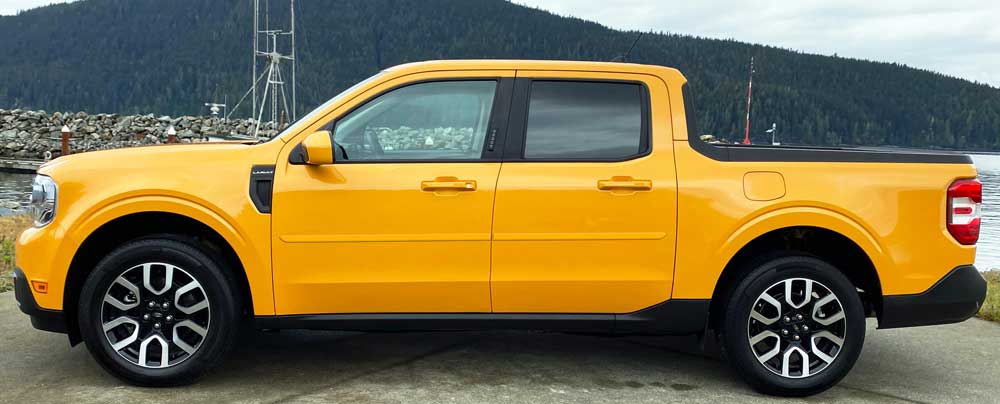
Ford Maverick Painted Body Side Moldings (middle door), 4pc 2022 - 2026
Set of 4 - 1.25" wide door moldings
Self-Adhering Painted Body-Side Moldings protect your car from scratches and door dings while adding a more sophisticated look than traditional molding.
- Each Painted Body Side Molding Kit comes complete with Easy-to-Follow Installation Instructions, Pro-Clean Prep Pads, and Pro-Bond Adhesive Promoter
- 100% Paint Match Guarantee
- 5-Year/50,000 Mile Warranty
- Made in the USA
- Added Protection against shopping carts, door dings, scratches, chipping, and other road hazards
- High Quality Automotive Grade ABS Synthetic Materials
- OEM Quality
- Measured, Pre-Cut, and Precision Engineered to match your Ford Maverick
-
Quick and Easy No-Drill Installation with the use of Self-Adhering 3M Tape
 ***Be sure to type color code in space provided for exact match***
Installing Painted Body Side Moldings on Your Vehicle
Body side molding isnt just a way to keep nicks out of your car doors. It also looks sleek and sporty on the side of your car. Affordable changes like this can set your car or truck apart from the rest.
You want to make sure you install the body side molding correctly. Otherwise, youll end up with uneven molding that can make your car look dented (exactly what youre trying to avoid). Here are some tips on installing your body side molding properly.
PLEASE READ ALL INSTRUCTIONS AND IDENTIFY THE ORIENTATION OF ALL PARTS BEFORE BEGINNING INSTALLATION
Installation
- LOCATION (See Diagram below):
Run masking tape as seen in the diagram below from POINT A to POINT B. Press tape against the
vehicle, making sure that the tape is straight from POINT A to POINT B. Repeat on other side of vehicle.

- CLEAN AND PREP:
For a proper installation, clean the surface where the molding is to be
installed using the included alcohol pads. Wipe off excess residue with a
clean cloth. For a strong, lasting bond, apply the Pro Bond promoter.
TEMPERATURE: Where cooler temperatures prevail, make sure the
molding is at room temperature. The recommended metal surface
temperature of the vehicle should be at least 75°F/24°C for proper
installation. If the surface is cold, use a heat gun to warm before proceeding with installation.
PROMOTER: Supplied is a crush swab Pro Bond self-applicator. Squeeze the applicator until you feel the
applicator crush. When the applicator becomes wet on the end, it is ready for use. Quickly apply a
thin coat of Pro Bond below the masking tape line, no further than 1 ¼ below the tape. Be careful not
to go lower than 1¼ as Pro Bond could dull the paint surface. Wait for approximately 2 minutes for the
coat of Pro Bond to dry before applying molding.
- INSTALLATION:
BEFORE STARTING
, peel back 12 of the red liner, removing the
rest of the liner as you install. Be sure to remove die cut end of
red liner from molding. DO NOT TOUCH THE EXPOSED ADHESIVE
with your fingers during the installation (NOTE: excess skin oil
will affect adhesion). Be sure to allow a gap at the rear edge of the front door and the front edge of the rear door (See Diagram below).

- APPLY THE MOLDING the top of the molding should follow along the bottom of your masking tape line,
which is your guide; peel off the rest of the red liner as you go.
- AFTER THE MOLDING has been installed, use a soft cloth and apply pressure along the entire length of
the molding to insure proper adhesion. Remove masking tape, and you will have an OEM style Custom
Body Side Molding that will give you many years of protection.
And last - enjoy your new moldings!!!!!
|
|
|
 |
|
 |
|
|
|
 |
|
 |
|
Features
Type of Paint:
Body Side Moldings are painted with 3 layers of Onyx-HD Waterborne Paint, and 2 layers of clear coat, just like OEM does so that they will match your vehicle perfectly. All products are thoroughly inspected, buffed, and polished to a showroom-finish.
Where to find your paint code:
In most cases, the paint code can be found on the tag of your vehicle which is usually on the driver side door jamb, or near the glovebox area. If you cannot locate your paint code, you can contact any dealership and give them your VIN # and they can locate it for you.
- Adds protection from dings, dents, & parking lot damage.
- Adds style to your vehicle to make it stand out from the rest.
- 100% made in the USA
- Made of high-quality ABS composite materials.
- Painted to match your vehicle using the same paint as OEM.
Measured, pre-cut, & precision engineered to fit your vehicle.
- Includes 4 Painted Body Side Molding pieces (1 piece for each door), easy-to-follow installation instructions with vehicle-specific diagrams, 2 Alcohol Pads, and 2 Pro-Bond Adhesive Promoter Crush Swabs (all you will need is a tape measure, masking tape, and a grease pencil).
- Quick & easy no-drill install with the use of 3M double-sided automotive-grade adhesive tape.
|
|
|
|
|
|
|


